Introduction
This article is a continuation of Parsing Markdown and Performing Custom Output in C# (Using markdig).
The tool mentioned in the above article, which converts Markdown to PPTX, creates PPTX files using the OpenXML SDK. I initially struggled greatly with using this OpenXML SDK, so this article will focus on that part.
The tool that converts Markdown to PPTX is available on GitHub.
What is OpenXML?
It’s a file format used since Office 2007, consisting of XML files bundled into a zip archive.
Therefore, by changing the file extension to .zip and then unzipping it, you can view the XML files inside.
Unlike the previous binary format, it allows creation even in environments where Office is not installed.
Development Environment
Here’s the setup:
- Windows 10
- Visual Studio 2017
- C#
- .NET Standard 2.0 Class library
About OpenXML SDK
I referred to the following official website for the OpenXML description method: https://docs.microsoft.com/en-us/office/open-xml/open-xml-sdk
However, understanding it solely from the explanations on the above site likely takes considerable time. Therefore, if you plan to use the OpenXML SDK from now on, I recommend the following method.
Open XML SDK Productivity Tool
https://www.microsoft.com/en-us/download/details.aspx?id=30425
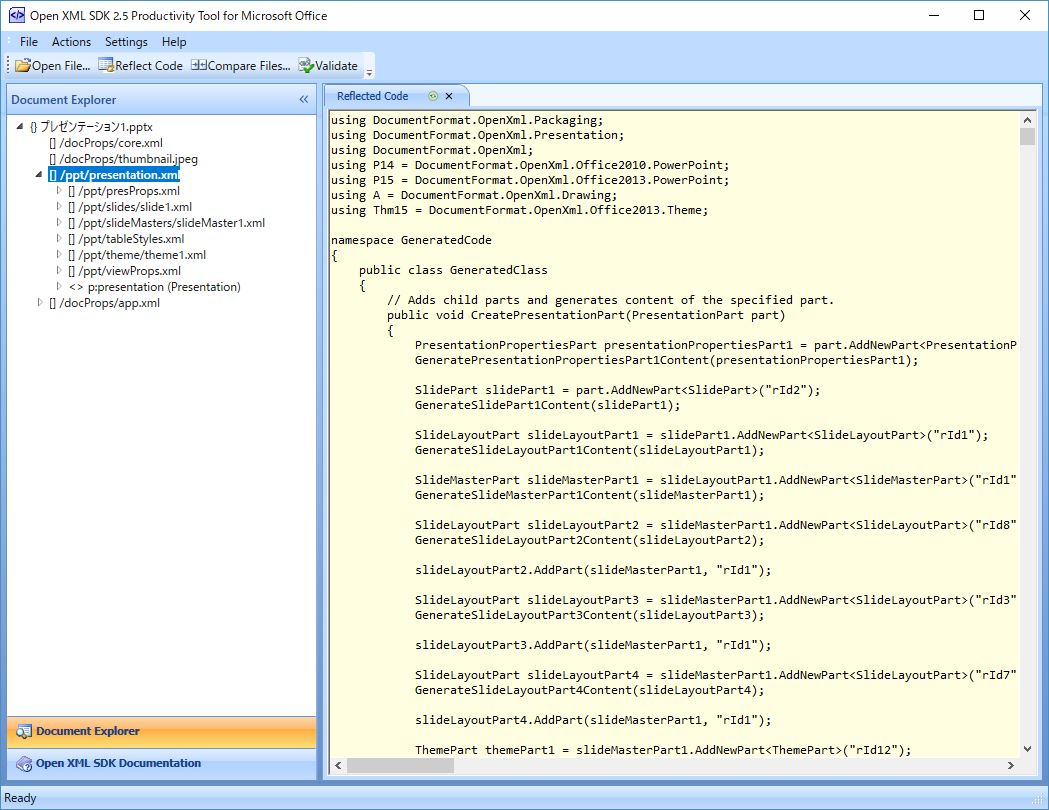
Using this tool, you can inspect the internal structure of a specified OpenXML format file (like xlsx or pptx).
What’s also helpful for tool creation is the feature that displays the necessary C# code to create the loaded file in the right-hand pane.
So, by creating a file with the content you want to implement, loading it, and examining the C# code, the possibility of creating something functional, even without 100% understanding, increases significantly.
I used this to find the code I needed by looking at small differences.
Example: How to find out how to make text bold
- Place only one text element in a newly created pptx file and check the C# code.
- Copy the above pptx file, make the text part Bold, and check the C# code.
- Compare 1. and 2.
Explanation of PowerPoint’s OpenXML Class Structure
Basically, using the method described above with the Open XML SDK Productivity Tool allows you to create the functionality you want, so the discussion could end here. However, I will write down the class structure I investigated below, partly as a personal memo.
The class structure of OpenXML files is quite large, so I’m focusing only on the important parts.
Overall Structure
First, the overall structure.
To create a PPTX, you’ll mostly interact with SlidePart and SlideMasterPart at the bottom of the diagram.
The division of responsibilities is roughly: SlideMasterPart for overall slide settings (like slide size), and SlidePart for individual slides.
ThemePart is manipulated when changing the visual design. Although not shown in the diagram, if you use slide layouts, you’ll also touch SlideLayout.
(The feature I created uses the Blank style sheet for all slides except the first title sheet, so I haven’t touched slide layouts.)
Slide
Next is the slide. Since it corresponds to a single slide in PowerPoint, the number of SlidePart class instances equals the number of pages.
The diagram above extracts only the classes that become important when implementing the following features:
- Placing text boxes
- Inserting images
- Inserting tables
Basically, all objects placed within a slide seem to hang under ShapeTree.
The most frequently used text box corresponds to Shape under ShapeTree in this diagram.
Picture represents images, and GraphicFrame represents tables.
ImagePart and HyperlinkRelationship, which hang under SlidePart, are not under ShapeTree. This is meaningful because, in OpenXML, images and hyperlinks have their actual substance embedded separately from the drawing objects. When used, the substance’s ID is referenced to paste the image, etc.
Therefore, if the same image file is used in multiple places, there will be multiple Pictures referencing a single ImagePart.
However, since these are all under SlidePart, it seems necessary to add another ImagePart when adding an image to a different sheet (can references span across sheets…?).
Shape
Next is Shape. Although I only used text boxes this time, judging by the name, I assume other shapes are handled in this part as well.
The features I wanted to achieve with the text box this time are as follows:
- Place text at an arbitrary position
- Allow setting bullet points
- Allow specifying fonts
- Allow specifying Bold, Italic, Underline, Strikethrough for fonts
- Allow specifying font color
- Allow changing font settings for only arbitrary strings within the text box
- Allow setting hyperlinks
Position and size are handled by Transform2D. There’s a very similar class called Transform, which seems to be used for tables that appear later.
The text settings themselves are done under TextBody.
ParagraphProperties handle horizontal alignment (Left, Center, Right) and bullet point settings.
For regular bullet points, BulletFont and CharacterBullet are used. For numbered incrementing bullet points, BulletFont and AutoNumberedBullet are used.
If no bullet points are needed, NoBullet is set.
Settings for the text within the text box are done using Run. By creating multiple Runs, you can mix strings with different font settings within a single text box.
Hyperlinks can be set on RunProperties. When used, the ID of the pre-embedded HyperlinkRelationship is specified in HyperlinkOnClick’s Id.
The background color of the text box and the foreground color of the font can be specified with SolidFill, allowing specification by predefined colors or RGB values. (Gradients might be represented by a different class than SolidFill).
Image
Next is images. An ImagePart object needs to be created beforehand. Since a Stream can be specified for the ImagePart object, you can read an image file using System.IO.FileStream and then create the object directly.
Similar to text boxes, position and size are specified using Transform2D. The image itself is specified by setting the Embed property of Blip to the ID of the pre-created ImagePart. If necessary, the stretching method can be specified in Stretch. (I didn’t use this, so I haven’t investigated it in detail).
Table
Finally, tables. It’s long, but some parts are the same as text boxes, so there aren’t that many new objects.
Position and size are handled by the Transform object (not Transform2D). Whether there’s a title row or not can be set in TableProperties.
To actually create the table, first add GridColumns to TableGrid for the number of columns. The column width can also be specified at this time. Next, add TableRows to Table for the number of rows. The row height can be specified in TableRow. Table cells are implemented by adding TableCells to TableRow. The content of TableCell is almost the same as TextBody and below from the text box section.
Afterword
This time, I wrote about what I learned regarding how to create PowerPoint files using the OpenXML SDK. Although I haven’t tried adding animations or various shapes, which weren’t covered this time, I believe it can be done similarly by analyzing with the Open XML SDK Productivity Tool. This tool is truly convenient.
Please refer to this if you want to add PowerPoint file output functionality to your C# application.