Sample Explanation
This article explains the implementation of the shared memory sample I wrote about yesterday.
ObjectDelivererの共有メモリのテスト題材作成中。
— ayuma (@ayuma_x) January 29, 2019
WPFアプリが毎フレーム自分のウィンドウを共有メモリに書き込んで、それをUE4側が読み込みテクスチャを更新してる。#ObjectDeliverer #UE4 #UE4Study pic.twitter.com/uWY2QhHnYP
WPF App Side
The WPF side writes the display content of its own window to shared memory.
The complete source code is in the following repository.
Creating Shared Memory
Create shared memory named “SharedMemory” with a size of 800 * 450 * 4 + 5. This size can store a bitmap of 800 pixels width, 450 pixels height, and 32-bit BGRA format. The final +5 is for the header elements used by ObjectDeliverer shared memory.
private MemoryMappedFile share_mem;
private MemoryMappedViewAccessor accessor;

share_mem = MemoryMappedFile.CreateOrOpen("SharedMemory", 800 * 450 * 4 + 5);
accessor = share_mem.CreateViewAccessor();
Hooking into WPF Frame Rendering Timing
Monitor the CompositionTarget.Rendering event to enable processing on every rendering frame.
CompositionTarget.Rendering += CompositionTarget_Rendering;
Writing Display Content to Bitmap
Root is the Name given to the control whose display content is to be obtained.
First, get the size of the display area using VisualTreeHelper.GetDescendantBounds, and create a RenderTargetBitmap matching that size.
Next, create a DrawingVisual and then write the display content to the bitmap.
Once writing is complete, copy the content of the bitmap’s pixel buffer into a byte array.
This byte array is what we need this time.
var visual = Root;
var bounds = VisualTreeHelper.GetDescendantBounds(visual);
var bitmap = new RenderTargetBitmap(
            (int)bounds.Width,
            (int)bounds.Height,
            96.0,
            96.0,
            PixelFormats.Pbgra32);

var dv = new DrawingVisual();
using (var dc = dv.RenderOpen())
{
      var vb = new VisualBrush(visual);
      dc.DrawRectangle(vb, null, bounds);
}

bitmap.Render(dv);
bitmap.Freeze();

var buffer = new byte[800 * 450 * 4];
bitmap.CopyPixels(buffer, 800 * 4, 0);
Writing to Shared Memory
Finally, perform the write to shared memory.
First, to conform to the ObjectDeliverer format, write a 1-byte counter. ObjectDeliverer only reads the subsequent content if this counter’s number changes, so it’s incremented with each write.
After the counter, write the size of the pixel buffer.
Next, copy the content of the pixel buffer, and it’s complete.
The above writing is performed every frame.
// write counter
accessor.Write(0, counter++);

// write buffer size
accessor.Write(1, (int)buffer.Length); // Cast to int for Write

// write buffer
accessor.WriteArray(5, buffer, 0, buffer.Length);
UE4 Side
The UE4 side reads the pixel buffer from shared memory using ObjectDeliverer and updates the texture using its content.
Creating a Texture Helper Class
As preparation for the necessary functionality, create a UTextureUtil class in C++.
Implement the following two functions in it.
// Fill out your copyright notice in the Description page of Project Settings.

#pragma once

#include "CoreMinimal.h"
#include "Kismet/BlueprintFunctionLibrary.h"
#include "Engine/Texture2D.h"
#include "TextureUtil.generated.h"

/**
 *
 */
UCLASS()
class OBJECTDELIVERER_API UTextureUtil : public UBlueprintFunctionLibrary
{
    GENERATED_BODY()

public:
    UFUNCTION(BlueprintPure, Category = "ObjectDeliverer Test")
    static UTexture2D* CreateTexture(int32 Width, int32 Height);

    UFUNCTION(BlueprintCallable, Category = "ObjectDeliverer Test")
    static void UpdateTexture(UTexture2D* Texture, const TArray<uint8>& PixelsBuffer);

};

// Fill out your copyright notice in the Description page of Project Settings.

#include "TextureUtil.h"
#include "Engine/Texture2D.h"
#include "RenderingThread.h"

UTexture2D* UTextureUtil::CreateTexture(int32 Width, int32 Height)
{
    auto Texture = UTexture2D::CreateTransient(Width, Height, PF_B8G8R8A8);
#if WITH_EDITORONLY_DATA
    Texture->MipGenSettings = TMGS_NoMipmaps;
#endif
    Texture->CompressionSettings = TC_VectorDisplacementmap;
    Texture->SRGB = false;
    Texture->UpdateResource();

    return Texture;
}

void UTextureUtil::UpdateTexture(UTexture2D* Texture, const TArray<uint8>& PixelsBuffer)
{
    if (!Texture || !Texture->Resource || PixelsBuffer.Num() == 0)
    {
        return;
    }

    FUpdateTextureRegion2D* Region = new FUpdateTextureRegion2D(0, 0, 0, 0, Texture->GetSizeX(), Texture->GetSizeY());

    struct FUpdateTextureRegionsData
    {
        UTexture2D* Texture;
        int32 MipIndex;
        uint32 NumRegions;
        FUpdateTextureRegion2D* Regions;
        uint32 SrcPitch;
        uint32 SrcBpp;
        uint8* SrcData;
    };

    FUpdateTextureRegionsData* RegionData = new FUpdateTextureRegionsData;

    RegionData->Texture = Texture;
    RegionData->MipIndex = 0;
    RegionData->NumRegions = 1;
    RegionData->Regions = Region;
    RegionData->SrcPitch = (uint32)(4 * Texture->GetSizeX());
    RegionData->SrcBpp = 4;
    RegionData->SrcData = (uint8*)PixelsBuffer.GetData();

    ENQUEUE_RENDER_COMMAND(UpdateTextureRegionsData)(
        [RegionData](FRHICommandListImmediate& RHICmdList)
        {
            RHIUpdateTexture2D(
                RegionData->Texture->Resource->TextureRHI->GetTexture2D(),
                RegionData->MipIndex,
                *RegionData->Regions,
                RegionData->SrcPitch,
                RegionData->SrcData
            );
            delete RegionData->Regions;
            delete RegionData;
        });
}
CreateTexture is a function to create a texture of the specified size.
UpdateTexture is a function to write the pixel buffer into the content of the passed texture.
(Note: UpdateTexture implementation updated to use render thread for safety)
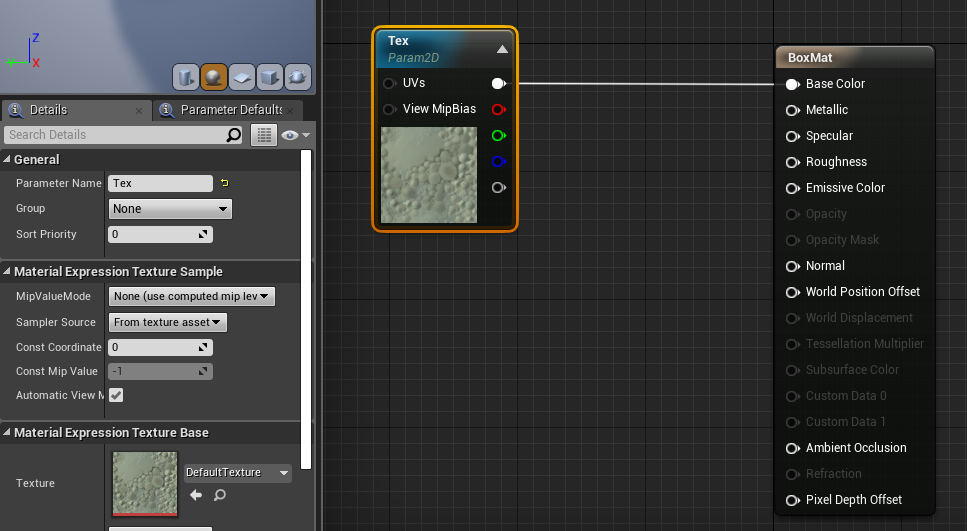
Creating a Real-time Updating Material
Prepare a simple material like the one below.
Just set the parameter name of TextureSampleParameter2D to “Tex” and plug it into Base Color.
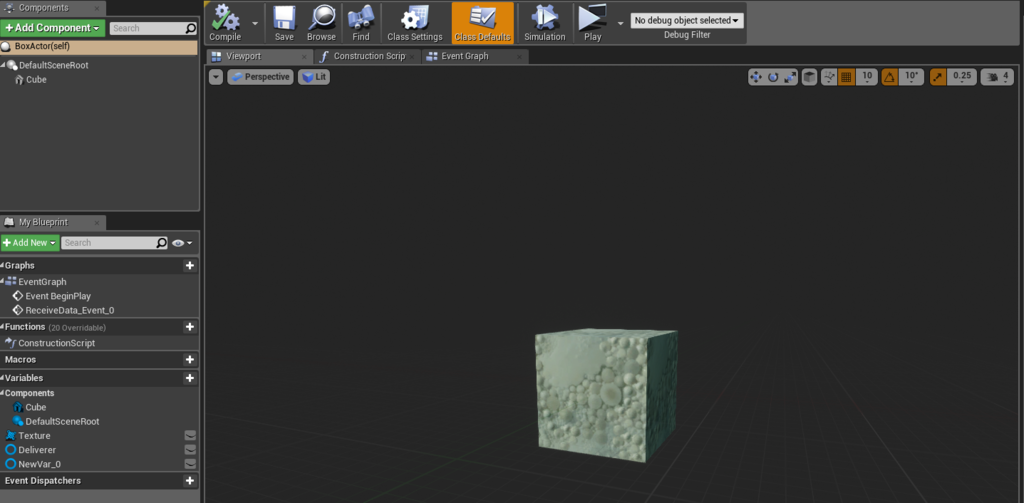
Creating an Actor
Create an empty Actor and place a Cube inside it.
Implementing Logic in the Actor
Connect the nodes sequentially in BeginPlay.
Creating the Texture
Create the texture using the pre-created UTextureUtil::CreateTexture.
Set the texture size to 800x450 to match the WPF bitmap size.
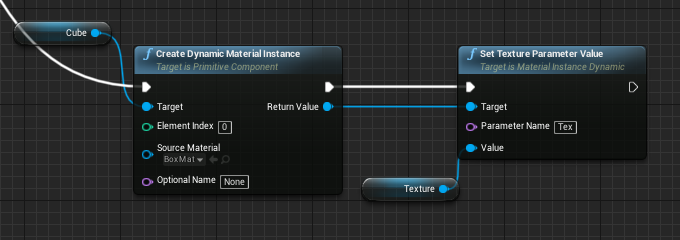
Creating Dynamic Material and Setting Texture
Create a Dynamic Material for the Cube and set the previously created texture to the material’s “Tex” parameter.
Now, the texture display will be reflected in the material.
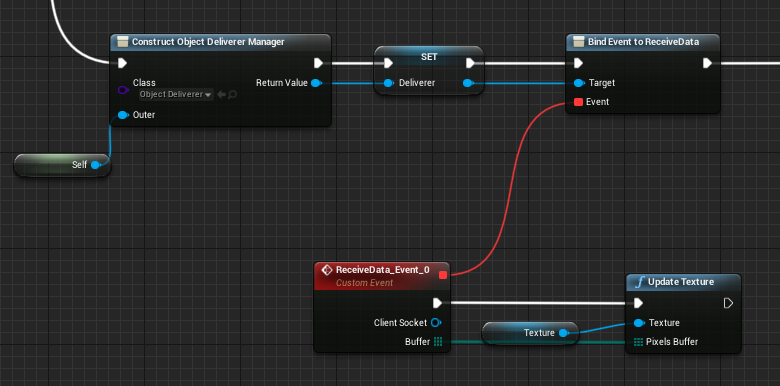
Registering ObjectDeliverer Receive Event
Create an instance of ObjectDelivererManager and monitor the ReceiveData event.
When the event occurs, update the content of the previously created texture using UTextureUtil::UpdateTexture.
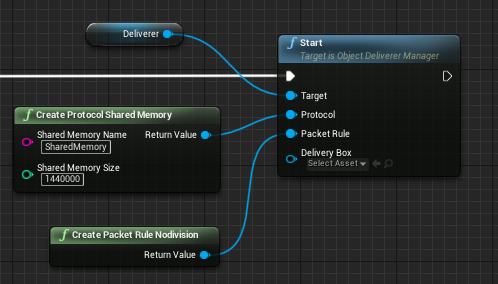
Starting ObjectDeliverer
Plug in the SharedMemory Protocol and Start.
For SharedMemory, specify the same name as the shared memory created in WPF, and for the size, specify the bitmap size (800x450x4 = 1,440,000 bytes).
Do not include the 5 bytes for the header in this size.
Entire Blueprint
Connecting the above Blueprints results in the following:

Done!
After implementing the above and launching both the WPF application and the UE4 application, the content displayed in the WPF window will be displayed on the surface of the UE4 Cube.